Feb 22: Coleoptiles on parade
In which I regale readers with tales of a successful experiment...
I have been writing about coleoptiles frequently, and mesocotyls too. Because for my Ph.D. I lived, ate, and breathed coleoptiles, they are my good friends. It strikes me though that maybe not everyone has been so luckily exposed. Therefore, I begin today with an annotated photo, hoping to parade the grass seedling’s wonderful organ.
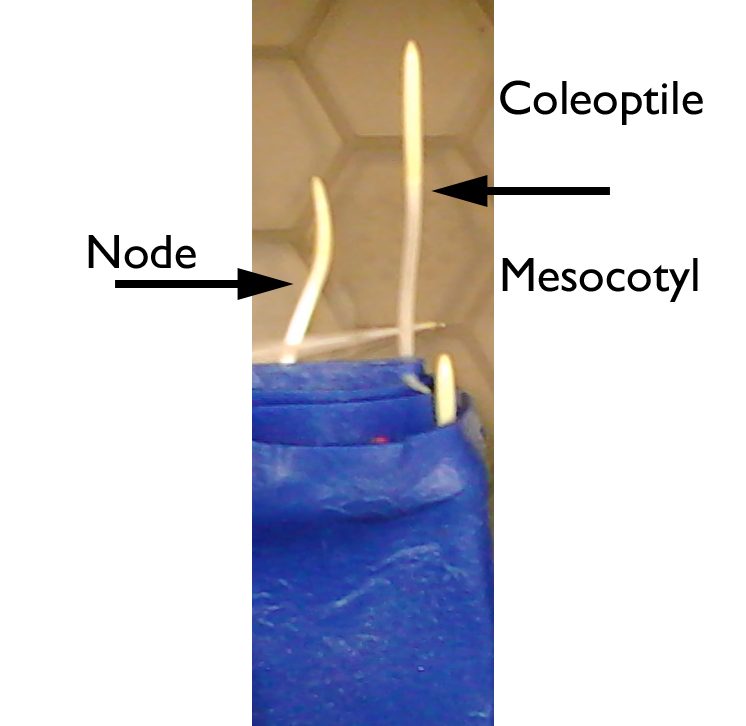
Dark-grown (etiolated) maize seedlings. The seedling shoot has a coleoptile and mesocotyl that meet at the node. The coleoptile is hollow and the first leaves are rolled up within, protected by the overlying coleoptile. The yellow of the coleoptile is from carotenoid pigments that are present mostly in the leaves. The seed and roots are covered by the moist blue paper.
Well, yes, it is a small parade, and no flags. A low-resolution parade, this image was snapped with a cell phone; I resolve to do better. Still, there they are.
The coleoptile was the object in last week’s experiment. The goal was to see how well the growth hormone auxin would stimulate the growth of 2 mm – long segments. To this end, I used four treatments: 0, 3, 10, and 30 µM auxin. All of the treatments contained 10 mM phosphate, adjusted to pH 5.9.
In the morning, I start the operation by taking the auxin stocks out of the freezer. They are dissolved in dimethyl-sulfoxide and need 45 min or so to thaw. To minimize light degradation of the easily-bruised auxin, I thaw them inside a dark box. I put the STOP sign on the corridor door to avoid a light catastrophe from anyone’s opening that door right when I have open the inner door to the experiment room. I trundle the computer into the corridor, start it up, and run the micromanager software (yes, really what it is called, open source, and truly image acquisition is a place where one appreciates micro-managing). Then, in the experiment room, using a flashlight (a torch in the UK vernacular, which sounds excitingly flammable) swaddled in filters to emit a green glow just enough to see by, I arrange the silver pen, washer-plates, p-1000 pipette, tweezers, and cutting block, carefully on, or adjacent to, the work tray. I fill the small petri dish with buffer, in which I will collect the coleoptile segments prior to distribution. Next, I turn on the infrared light source, put a blank washer-plate in the holder above the camera, test the image capture, and set up the ‘save into an album’ routine, so that I’ll be able to capture each image of the segments from inside the room by clicking on the wireless keyboard. Finally, back in the lab, I mix up the needed treatment solutions and bring them into the experiment room.
Now, the actual experiment begins. Inside the dark room, I take off the black cloth, open the outer black box, take out the inner black box and put it on the table near the work area. Then, I sit down and don the sniper-scope. This involves snuggling the harness onto my head, squeezing on the chin strap, tucking the ends of the black-cloth mask into my shirt collar, and turning the ‘scope on. This floods my left eye with light. Working with this is “fun” because the head harness is loose and the eyepiece drifts away from my eye. Still it beats fumbling around in complete darkness.
I fish out a seedling with a shoot standing well up off the wet substrate (5 cm long more or less), cut the mesocotyl at the base with my fingers (snap!), toss the leftover (seed and roots) back into the box, and bring the cut shoot to the cutting block, a small piece of metal with two parallel razor blades sticking up, separated by 2 mm. I allow the very tip of the coleoptile to hang over one blade by 2 mm (ish) and I bring the shoot down gently on the razor blades, slicing a 2 cm segment between them. I repeat this twice, so there are now three segments between the blades. This amounts to 6 mm of coleoptile, which is about all there is. Then, I transfer the three segments to the collection dish with buffer, and repeat. Since I have six segments per treatment, and four treatments, I need 24 segments. It takes about 10 minutes to harvest the required eight coleoptiles.
Then I put 1 mL of treatment into a washer-plate, note down its number with the silver pen, put it in the holder over the camera, and hit the space bar on the keyboard. Typically, I hit space bar twice, just to make sure. Then I put the washer-plate on the shaker table and place a small plastic dish over the washer to minimize evaporation of the treatment solution. It took perhaps another 10 min to do this for all four treatments. The slow bit is grabbing each segment in the accumulation dish—they tend to dart away from the tweezers and the visibility through the sniper-scope is limited.
With the last one done, I turn on the shaker table, take off the sniper-scope harness, placing it carefully on the table, and heave a sigh of relief. By feel, I collect the plant box so the carnage of cut-up plants won’t bother the starts of the experiment, and the cutting block, to clean the razors promptly. With these things out of the experiment room, it remained only to check the image capture.
Oh horrors! I had captured a series of blanks. The image that I had used to test the set up had been left open on the screen and apparently confused the save-in-album routine, causing to write that image again and again into the album. Crap! But keep calm, and snap them again. I set up the album routine, making sure this time that there were no stray images open, and went back inside. I had to harness up the sniper scope and then carefully move the washer-plates one by one for imaging. Not so bad, take off the harness, go check. Another error! There were three images, not four. Did I forget to hit space bar? The problem is that there is no internal identification in the images (that is why I take pains with the silver pen). I had no idea which one was missed. Crap squared! Nothing else for it but to take another round of images, and back inside I went. And emerged some minutes later and found, phew, all four treatments were imaged. Just save it and go. But… wait for it… instead of saving, the album with the four images disappeared. Poof! I hit the wrong box on screen. Crap now raised to a massive power!
Well the fourth time was charm and the initial images were at last saved, only about 30 min later than planned. While this made me feel weepy and in need of a large swig of some high-proof liquid, the growth period will be 5 h or so, and thus the delayed 30 min is acceptable.
And indeed, I came back after that interval, snapped the final images, measured them up and got reasonable data. As follows:
……………….Growth rate in length Growth rate in width
…………………..% per hour % per hour
Control -0.1 0.7
3 µM auxin 3.2 0.2
10 µM auxin 3.1 0.8
30 µM auxin 2.8 0.25
There are several things that I have learned from this. First, the negative growth rate in the controls is a worry. I don’t think they really shrank. I might have made a mistake measuring them, or it is possible that, by the fourth time going for the initial images, I got careless and captured them in the wrong order. But be that as it may, this is experiment is for broad strokes only.
The results are comparable to what I got last time when I used mesocotyls. There too, auxin elevated elongation rate to around 3% per hour, and did so rather similarly for the concentrations 1, 3, and 10 µM. Combining that experiment and the one above, even though they are on different organ types, I will use 3 µM as a test concentration. Again, as before, nothing much happened to growth in radius, although the sensitivity of this arrangement is not enough to pick up small changes. Nevertheless, a large shrinking of the kind reported to happen with acid seems absent.
What’s next? The major issue here is that 3% per hour is disappointingly low. For practical work, rates nearer to 8% per hour are needed. What is next is to try to achieve that. Why are the rates too low? There are myriad possibilities. First is that totally etiolated coleoptiles actually grow fairly slowly. The coleoptile gets driven up towards the soil surface by the mesocotyl, but needs a glimmer of light to start elongating rapidly. This could be one area where my strict darkness is a problem. It could be that the auxin treatment would overcome this disinclination but the intact coleoptile probably had plenty of auxin. For that reason, I will return to the mesocotyl.
But wait – the first experiment used mesocotyls and the elongation rates were about the same. Yes and no. The first experiment did use mesocotyls, but the material sampled was somewhat distant from the node because I could not see it and I estimated its position. Now that I have seen these stems frequently in the light I am aware of just how short the coleoptile is, about 1.5 cm. I estimated something more like 3 or 4 cm. This is problem because the mesocotyl will have a gradient of elongation rate, being high at the node and dropping off toward the base. Therefore, the first experiment might have had low elongation rates because the mesocotyl region sampled was slow-growing. With the matt black paper under the cutting block, I can see the node and so I will be able to use material close to the node and check out that possibility.
Another reason for the slow elongation is that the auxin is having difficulty getting taken up and doing its thing. In the treatment solutions, I have been using 1o mM phosphate buffer at pH 5.9. I have seen this in the literature, although it is often used at 5 or even 1 mM. I will go back to basics and add auxin to the following:
10 mM KPO4 pH 5.9 (the control, what I have been using).
Water (the simplest possible).
Sucrose (provide some energy).
Calcium (0.5 mM or so, helps everything go smoothly; plant coffee).
Salt (say KCl, because the cell wall liquid probably has a bit of this and it might leak out in the large volume of the experimental treatment).
Note that the specified treatments do not control proton concentration. I think this is reasonable because protons are implicated in auxin machinations. There is some argument over whether pH-clamping the cell wall does, or does not, block auxin from stimulating elongation. I don’t want to get into these arguments but I don’t see any reason to control proton concentrations. In the case of an un-buffered solution, the proton concentration in the cell wall space will be dictated by the plant. That seems like a good thing.