26/10 Futzing
Futzing is indeed the word that comes to mind when recalling the adventures of the past week, a word I am surprised to see that my spell-checker knows. I wonder whence that word? Perhaps onomatopoeia from the sounds made by pumps or vacuums that refuse to run? Or perhaps descriptive of the hapless fixer–part klutz and part putz? (Note, the spell-checker turns up its nose at the latter.)
The week began with futzing over making scans. As I described last week in ramping up, I had put plates with seedlings in four different areas and ‘ticked’ the position of the root tips once a day. The experiment ended on the Monday so I could include the weekend’s growth. I used to do experiments like this a lot and at the end of it, I would photocopy the plates and measure the distance between the ticks along the root with a digitizing tablet. Once upon a time, such tablets were the bees knees for quantifying information from images, but as scanners and image analysis programs grew in quality and sophistication, tablets went the way of photographic dark rooms. I kept a tablet going in my lab driven by a computer running MS DOS up until around 2008 because the ergonomics of measuring on the tablet beat that on a computer and because the tablet had 10,000 pixels on a side, which is delightfully high resolution. It still makes me smile when I remember the day that Jan Judy-March and I went down to Staples and compared their countertop photocopiers to find the one that did the best job on a Petri dish of seedlings.
Be that as it may, no question of a tablet around CPIB, but they do have fancy all-in-one copier, scanner, printer machines, to which I brought my set of plates. On the first go, scanning failed completely, until I discovered that the machine refused to consider a Petri dish as scan-worthy and had to be tricked by placing a small piece of paper along side the dish. The first scan came out kind of poor and then I managed to inactivate the touch screen used for input. As I was uttering words the spellchecker would be unlikely to acknowledge, some kind soul pointed out that there was a dedicated scanner in the ‘scope room, so I tried that one. Thanks to the idiot-proof instructions on the wall, I got some scans but they were so poor I decided to see if the touch screen on the fancy unit had thawed. It had, but the scans I made looked, well, in lack of a precise term, odd. There were quite a few adjustable parameters and I kept adjusting them, and by chance discovered that the whole problem was solved when I changed black and white to color. This was futzing with a happy ending.
Here are the data:
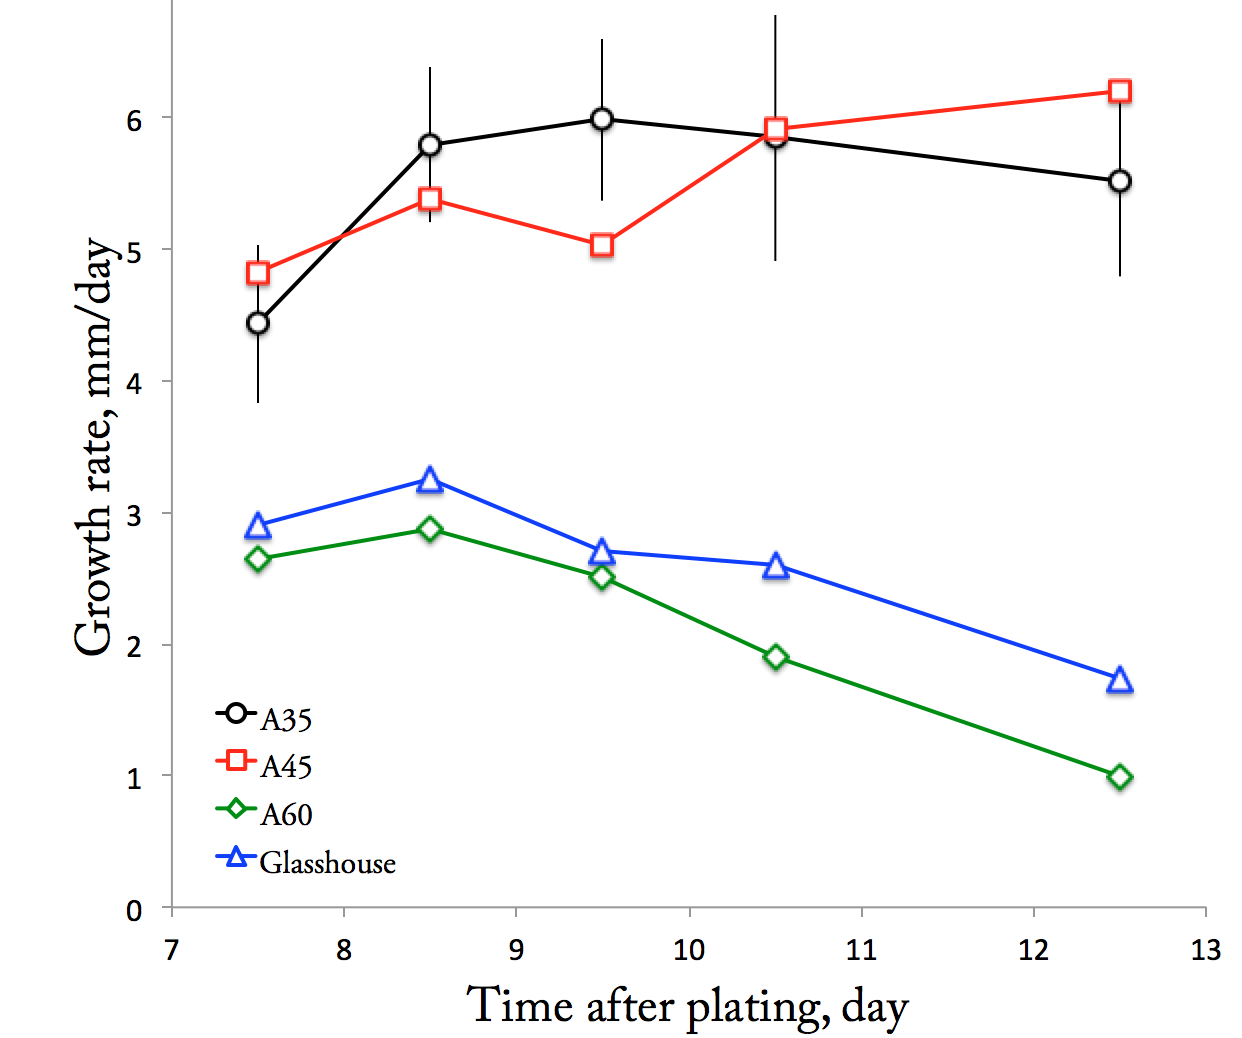
Growth rate versus time for lab weed roots in different places in CPIB. Each plot represents a single plate of seedlings and the error bars are the standard devisions, shown just on one line for clarity.
As I could see by eye, the growth chamber A60, which I had been using, was the worst of the lot (green line). The one in the glass house was about as bad, which makes me wonder whether ultraviolet light in the bulbs is to blame. I am trying to find a suitable light meter, but so far without success. The other two chambers are better, but nevertheless have substantially lower root growth rates than I expect based on prior experience. The next test is the one I mentioned last week using Hoagland’s medium and I’ll know if that makes a difference this coming week.
The other major piece of futzing was over the set up for measuring segments. This involved extending futz tendrils into both software and hardware. I mentioned a few of the hardware issues in the last post but software comes up in the camera used for imaging. The camera (IDS microEye) came with a software interface, called microEye Cockpit, to drive it. I had been using this software to check out the imaging conditions, lighting and so on. As such it was fine, but I began to realize that it was hardly full service, and that this camera was mainly intended to be sold to manufactures who were designing rigs into which the camera would be embedded and original code written for the camera. As a result, the Cockpit software was more or less supposed to be a demonstration.
I had a few uneasy moments thinking that I (or rather someone here) would have to write code, before Darren and Mike Wilson remembered Micromanager, an open source project, providing reasonable user-interfaces for cameras with microscopy in mind, and based around good old imageJ. Installing that led us to discover that one of the untoward things that Cockpit had been doing, surreptitiously, was cranking up the gain to keep the camera going at video rates. I had been bothered by the noisy images and suddenly I knew why. With Micromanager, I could increase the exposure time to a good fraction of a second, and quench the noise altogether.
This led to a new series of futzes (incredibly – also known to my spellchecker!) involving the infrared light source and its position from the camera. Here is a picture of the set-up I arrived at after the latest round:
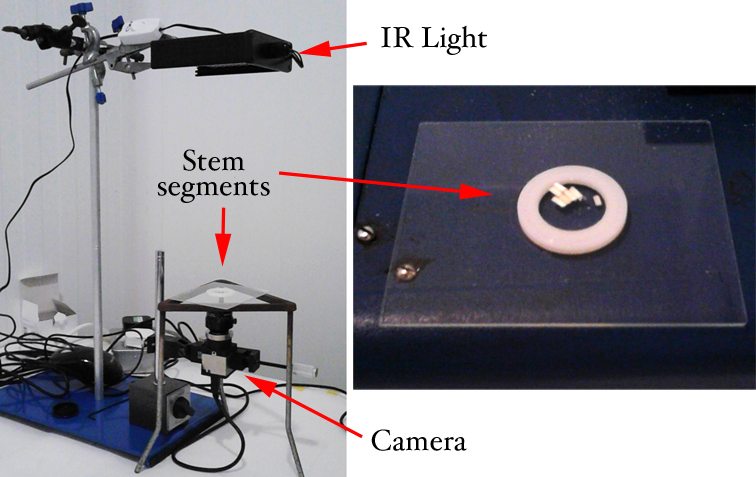
Futzing output. The left is an overview of the set-up for imaging stem segments. The right shows a closer view of the segment holder.
The washer is greased onto a glass plate, which gives a gentle meniscus because water does not wet Teflon so well. The segments in the middle of the washer are from the maize seedling stem, and are floating in water. The plate is held less than inch above the lens, and the light source is a foot or so above. Not shown here is a second glass plate, held an inch or so above the segments on which two pieces of diffusing plastic are set. Without these, the light field varies drastically but with the diffusers, the field is reasonably uniform. By using two pieces of the diffusion plastic, the intensity is also cut down, allowing me to close the iris on the lens all the way down. This increases the depth of field and allows me to focus. Finally, here is an image of the stem segments, taken through the camera with this arrangement:

Maize seedling stem segments as imaged through the setup shown above.
The segments are cleanly shown against the light background. Should be straightforward to measuring their length and width and getting an effective way to do that is the next step.